
Brightspace - Quiz Setup
Quiz Tab Overview
When inside a course, create a new quiz.
- Inside a course.
- Select "Quizzes" link from course nav bar.
- Select blue "New Quiz" button.

Each quiz has 6 tabs that control setup related to a quiz.
- Properties tab
- Naming; Adding/Managing Questions; Quiz Display parameters; Descriptions
- Restrictions tab
- Set up Due, Start, and End dates; Assign conditional release parameters;
- Assessment tab
- Associate with Grade item; Set associated automatic grade-related processes
- Objectives tab
- Set up objectives related to quiz completion
- Submission Views tab
- Set up "Submissions View" parameters to inform learners of performance related to quiz taking
- Reports Setup tab
- Set up reports to detail a variety of data associated with the quiz

Properties
Properties tab: Naming and Category Association
In this area, users establish the quiz.
- Give the quiz a name.
- inserting a name is necessary to continue creating a quiz
- Choose a "Category" from the drop menu or select to "Add New Category"
- a category is not necessary but can help for organizational purposes

back to top
back to top of Properties
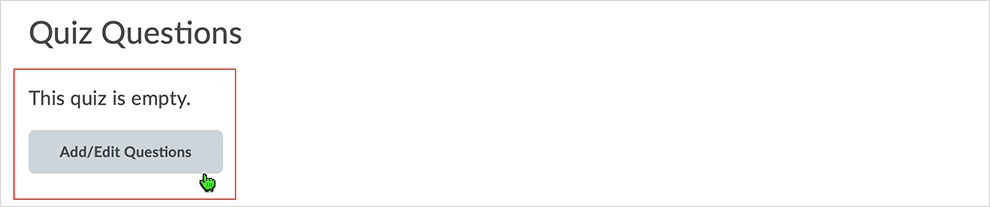
Properties tab: Adding Quiz Questions
When a quiz is first created, the quiz is empty. Select the "Add/Edit Questions" button.
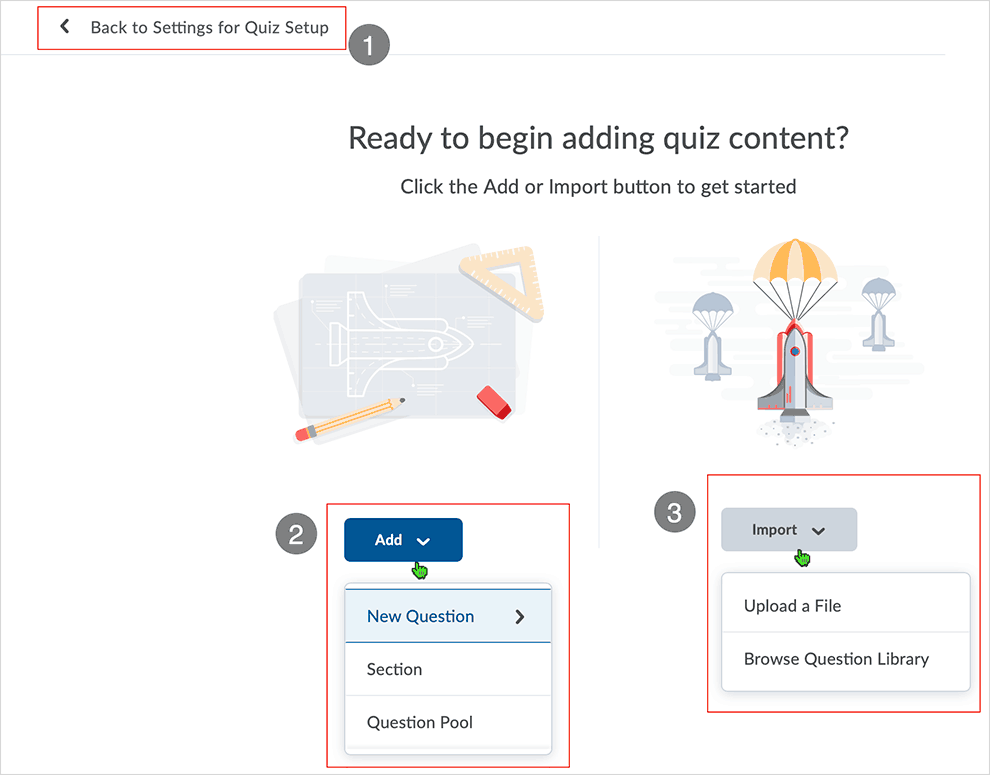
Add quiz content.
- to exit the area and go back to the quiz select the "Back to Settings for _____" link
- the quiz name will be populated in the _____
- Add questions to the quiz
- add a "New Question"
- select from question types to create new questions
- questions created in this fashion are "married" to the quiz
- add a new "Section"
- a Section is a directory (folder) to hold questions
- select existing questions from the Question Library to create a "Question Pool"
- to create question pools the questions must be in the question library
- a Question Pool is a random set of questions for a quiz
- add a "New Question"
General overview example:
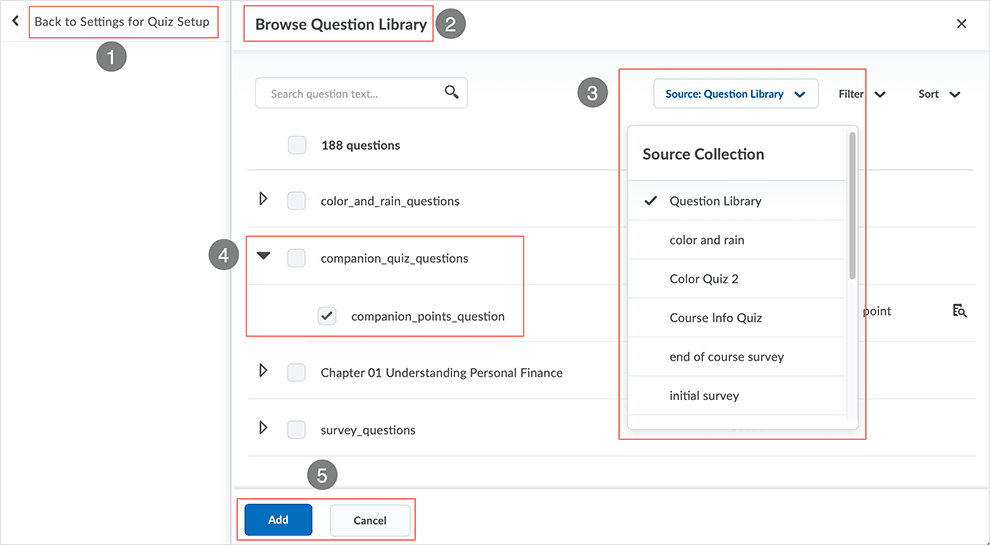
In this example, illustrated below, "Browse Question Library" has been selected.
Selecting "Browse Question Library" causes a navigational page to fold out.
- to exit the area and go back to the quiz select the "Back to Settings for _____" link
- the quiz name will be populated in the _____
- "Browse Question Library" statement shows where the user is in the area
- select the "Source:" drop menu
- select the source to get questions via the "Source Collection" choices
- turn the caret icons by clicking on them to reveal questions in available sections
- click a checkbox to select either the section plus question(s) or questions discreetly
- the "companion_points_question" has been selected
- it is associated with the "companion_quiz_questions" section
- select the blue "Add" button to add selected question(s) to the quiz
After selecting "Add" button, an "in-betweener" page displays.
- Initially, an "Add" and "Import" series of buttons display - select the appropriate button to add or import additional questions as necessary.
Select a checkbox and the "Delete" and "More Actions" buttons display (as below).
- to exit the area and go back to the quiz select the "Back to Settings for _____" link
- the quiz name will be populated in the _____
- choose to "Delete" questions as necessary
- select checkboxes related to questions that are to be worked on
- choose "More Actions" drop menu to toggle Bonus, Mandatory, and/or Set Points
- select checkboxes related to questions that are to be worked on
- Toggle Bonus: make the selected question(s) bonus questions
- Toggle Mandatory: make the selected question(s) mandatory - must be answered
- Set Points: adjust the points that each selected question is worth specific to the quiz

After finishing any adjustments, select the "Back to Settings for _____" link to return to the Properties tab of the quiz.
back to top
back to top of Properties
Properties tab: Managing Quiz Questions
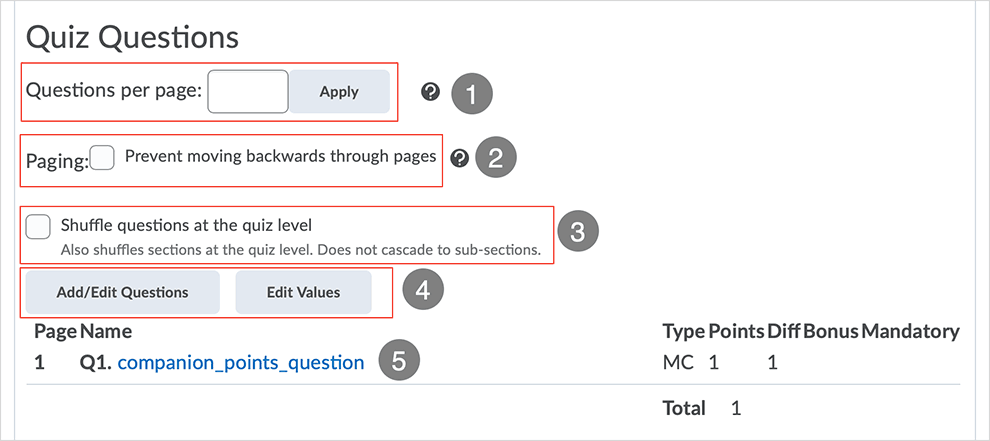
Mix and match #1-3 as necessary. "Add/Edit Questions" and "Edit Values" (#4) gives access to question related processes.
- Assign the amount of questions to display on a quiz page.
- select "Apply" button to make it stick
- leaving it blank displays all questions on one page
- Instructors can select this checkbox to prevent learners from moving backwards in the quiz.
- Questions will be displayed in a different order for each quiz taker.
- Add/Edit Questions and Edit Values
- select the Add/Edit button to access the questions associated with the quiz
- select Edit Values to:
- adjust quiz points, difficulty, bonus, and mandatory toggles from the Properties page
- Select the quiz question link to see a preview of the question
- preview page also displays any "Comment" or "Hint" associated with the question
- preview page also displays any "This question is also in the following" to show where the question is used in other quizzes and whether it is in the Question Library or not
back to top
back to top of Properties
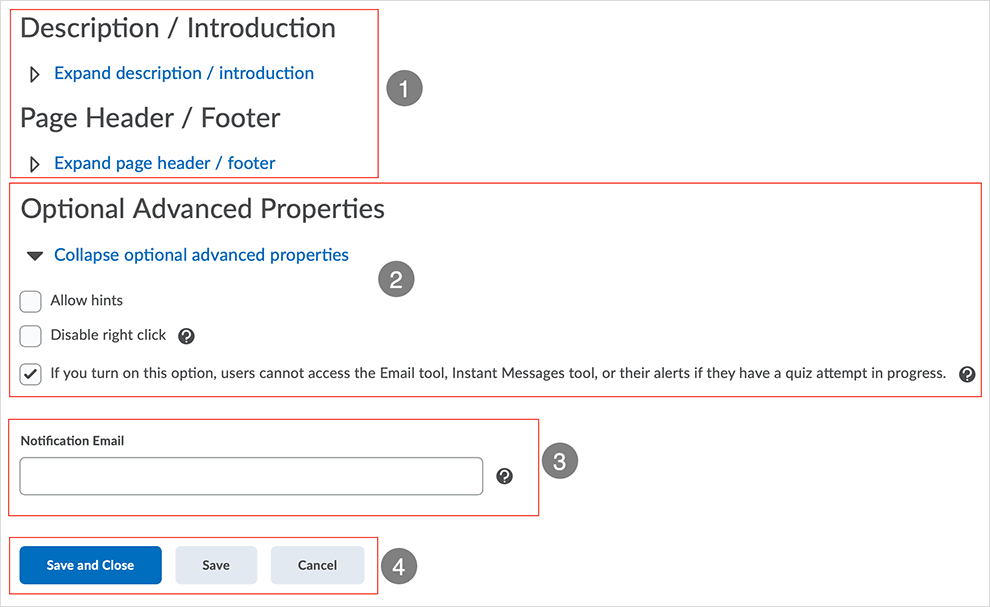
Properties tab: Description/Introduction; Header/Footer; Optional Properties
This area at the bottom of the tab gives access to additional parameters related to quiz setup.
- Expand the caret icons to access areas to add information to various areas of the
quiz.
- In all instances: the on/off toggle needs to be set to "on" in order for the messages to be seen by quiz takers
- Description/Introduction displays on the "Start" page of the quiz.
- Description at the top of the page
- Introduction at the bottom of the page above the Instructions area
- Page Header/Footer displays in the quiz.
- "Optional Advanced Properties"
- expand or collapse optional advanced properties using the caret icon
- "Allow Hints" - if hints are in the questions selecting this will make them visible
- "Disable right click" will disable right click for quiz takers
- Select the "If you turn on..." check box to prevent easy sharing of information during
quiz time
- Note: If a quiz taker doesn't submit a quiz after beginning it, this setting will prevent access to Brightspace mail and the Instant Messages tool until the quiz is submitted.
- expand or collapse optional advanced properties using the caret icon
- In the Notification Email field, enter an email where notifications about quiz completion will be sent.
- In all instances, throughout the area, selecting "Save and Close" or "Save" is necessary for changes to be applied to the quiz.
back to top
back to top of Properties
Restrictions
Restrictions tab: Visibility and Dates
On the Restrictions tab set up visibility and related dates.
- Restrictions tab is active.
- Quiz is now established.
- "Edit Quiz - _____" naming at the top of the page
- the quiz name will be populated in the _____
- select the caret icon to the right of the "Edit Quiz - _____" area
- drop menu gives access to Grade, Reports, Statistics, and Preview functions
- "Edit Quiz - _____" naming at the top of the page
- Select/deselect the "Hide from Users" checkbox as needed
- Due Date, Start Date, and End Date all function similarly
- select the checkbox to the corresponding Due, Start, or End date
- use the calendar function to place put a date in place
- adjust the time
- select "Now" to release immediately
- After a Start or End date checkbox is selected, the "Display in Calendar" checkbox becomes available

In all instances, selecting "Save and Close" or "Save" is necessary for changes to be applied to the quiz.
back to top
back to top of Restrictions
Restrictions tab: Release Conditions and Optional Restrictions
Release Conditions and Optional Advanced Restrictions are able to be set.
- "Create and Attach" Release Conditions
- "Condition Type" is a drop menu with choices
- in this instance, "Quizzes > Score on a quiz" has been selected
- "Condition Details" shows the condition type category and allows selection
- in this instance, a quiz can be selected from the available quizzes listed
- select the blue "Create" button to place the condition
- "Condition Type" is a drop menu with choices
- as needed, set up "Optional Advanced Restrictions"
- select the caret icon to expand or collapse as needed
- a "Password" can be assigned to control access to a quiz
- an "IP Restriction (IPv4)" range can be placed on quiz accessibility
- Select "Add new IP Range" to specify
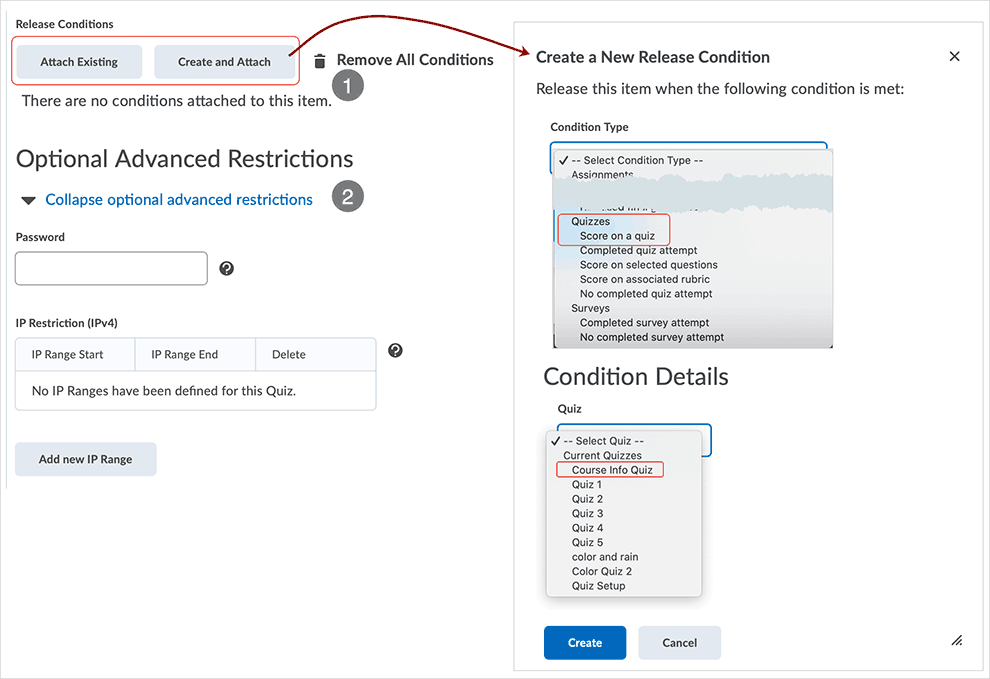
In all instances, selecting "Save and Close" or "Save" is necessary for the changes to be applied to the quiz.
back to top
back to top of Restrictions
Restrictions tab: Timing
Set the timing behavior of a quiz. Time is configured in minutes.
- Select "Recommended Time Limit"
- the quiz will be available for the specified amount of time
- Select "Enforced Time Limit"
- gives control over the time the quiz will be available
- add Grace Period as determined
- "Enforced Time Limit Behavior"
- after a grace period has ended, the quiz attempt is flagged
- the option chosen will apply
- gives control over the time the quiz will be available
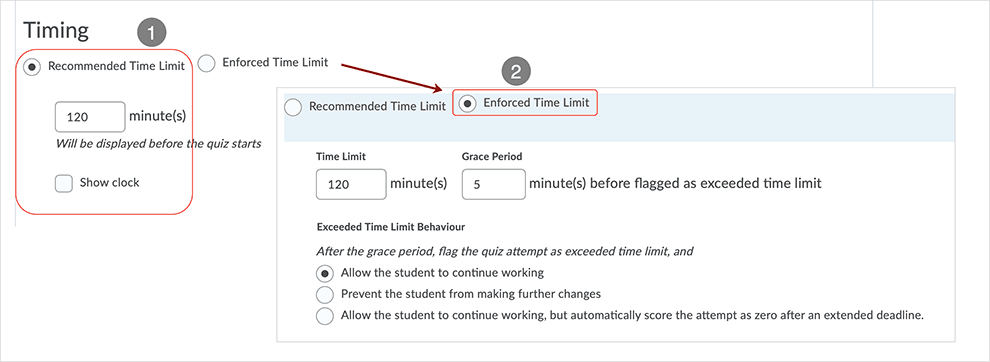
In all instances, selecting "Save and Close" or "Save" is necessary for the changes to be applied to the quiz.
back to top
back to top of Restrictions
Restrictions tab: Special Access
Select this link to access a stand-a-lone MSU tutorial about setting up and using Special Access in a quiz
Managing users (typically Instructor role) can set "Special Access" parameters for quizzes in Brightspace, and release the adjusted settings to individual or multiple users.
Applying "Special Access" enables allowances for different needs of learners. Adjustments can be made to the quiz Start, End, and Due dates; the "Recommended Time Limit" and "Enforced Time Limit" timing settings; and the number of attempts allowed.
"Types of Access" include two choices: "Allow selected users special access to this quiz" and "Allow only users with special access to see this quiz" selections.
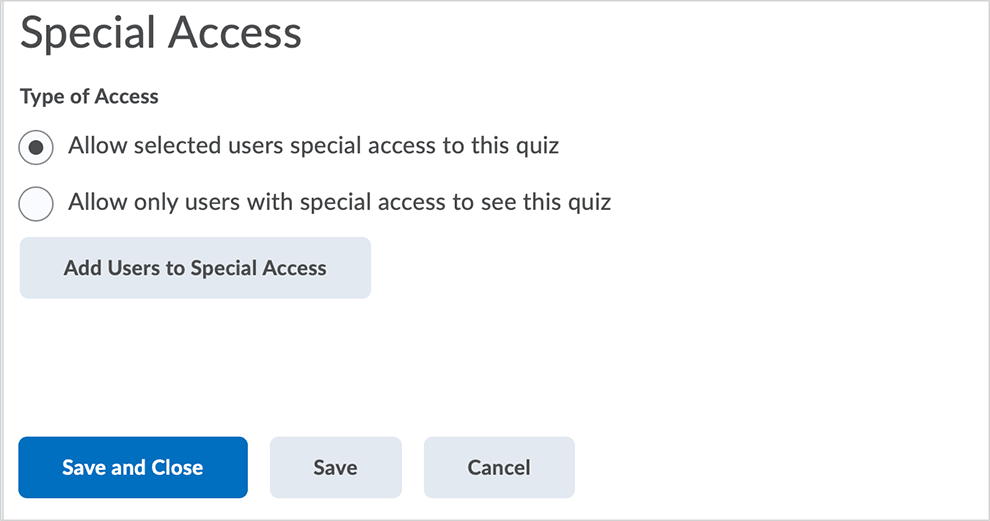
In all instances, after making adjustments, selecting "Save and Close" or "Save" is necessary for the changes to be applied to the quiz.
back to top
back to top of Restrictions
Assessment
Assessment tab: Grade Item
On the Assessment tab, link to or set up a grade item to be connected to the quiz. Control automatic grading properties.
- The Assessment tab is active.
- Select the checkbox to enable "Automatic Grade" function.
- Choose a grade item that has already been created from the "Grade Item" drop menu
or select "add grade item" link to spawn a "New Grade Item" dialog box
- when creating a new grade item from this area, complete the necessary parameters and select save to create the item
- When a grade item is associated with the quiz, the "Allow automatic export to grades" checkbox will be active for selection.
- When a grade item is associated with the quiz, select the "Student View Preview" caret icon to "Edit Display Settings" as necessary for the grade item.

In all instances, selecting "Save and Close" or "Save" is necessary for the changes to be applied to the quiz.
back to top
back to top of Assessment
Assessment tab: Attempts default
Adjust the number of Attempts available to quiz takers.
- "Attempts" area is located mid-way down the page.
- Adjust the number of attempts by selecting the "Attempts Allowed" caret icon and choosing
from the drop menu made available - select "Apply" to apply the changes.
- changing the attempt to anything other than '1' causes "Optional Advanced Attempt Conditions" to appear
- Use "Overall Grade Calculation" to adjust grading parameters associated with with the attempts allowed.
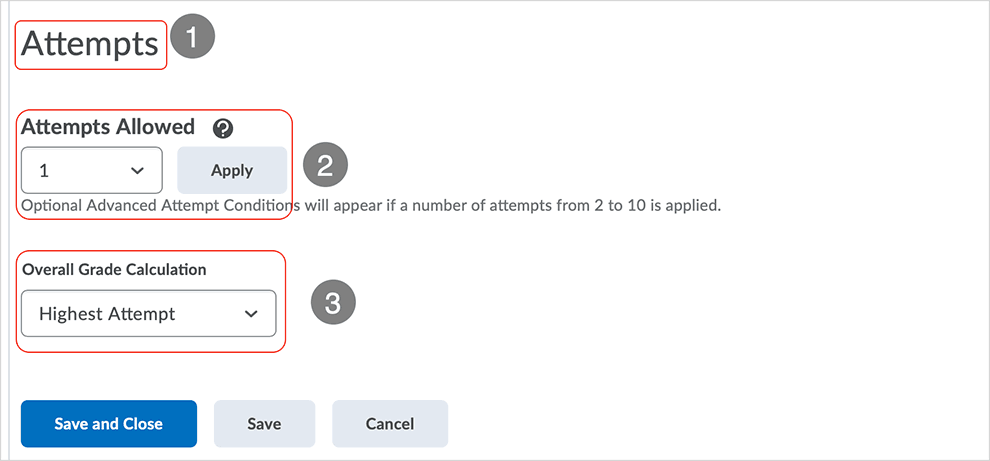
In all instances, selecting "Save and Close" or "Save" is necessary for the changes to be applied to the quiz.
back to top
back to top of Assessment
Assessment tab: Advanced Attempt Conditions
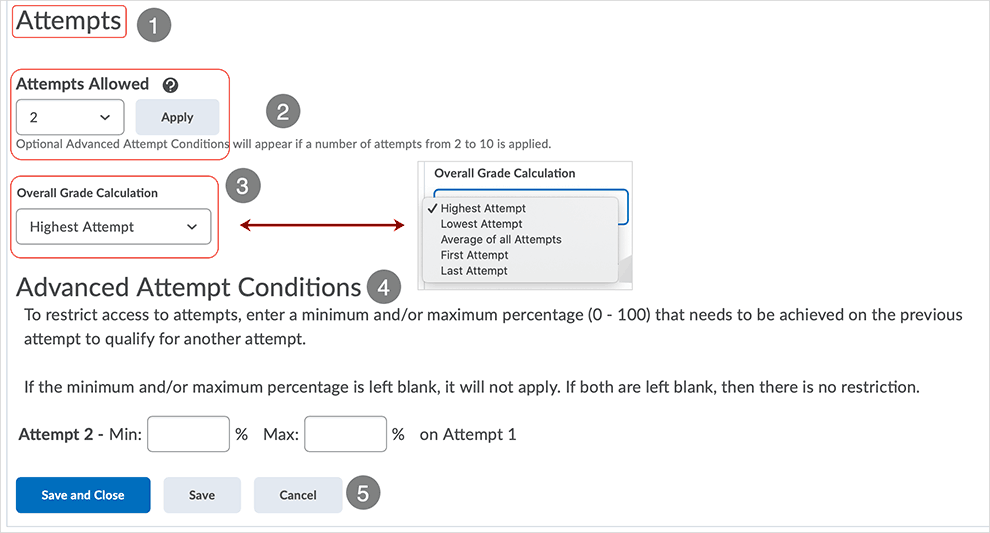
If more than one attempt is allowed, "Optional Advanced Attempt Conditions" appear.
- "Attempts" area is located mid-way down the page.
- In this example, '2' attempts are in place.
- The "Overall Grade Calculation" is used to adjust grading parameters associated with
with the attempts allowed.
- selecting the caret icon associated with "Overall Grade Calculation" gives a drop menu as illustrated below
- choose from Highest, Lowest, Average, First, and Last Attempts to tailor the score derived from quiz takers
- "Advanced Attempt Conditions" controls attempt access as described
- In all instances, selecting "Save and Close" or "Save" is necessary for the changes to be applied to the quiz.
back to top
back to top of Assessment
Objectives
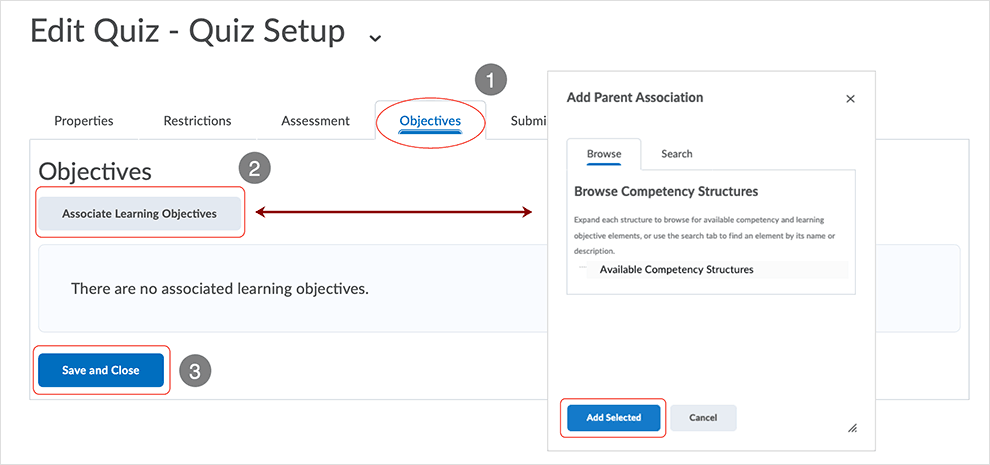
The Objectives tab facilitates links to Competency Structures located in the Competencies tool. Competency structures help assess users' learning outcomes and determine if they have acquired the intended knowledge, skills, and abilities from a learning experience.
- The Objectives tab is active.
- Select the "Associate Learning Objectives" button to "Browse Competency Structures"
- choose an "Available Competency Structure" if a proper Competency Structure is available for use
- select "Add Selected" if a Competency Structure has been selected
- Select "Save and Close" if a Competency Structure is selected for use.
Resources from Brightspace Help area:
Select this link to access a "Track the knowledge learners acquire as they learn" help area.
Submission Views tab
Quiz Submission Views display quiz related information after quiz submission.
Select this link to access a stand-a-lone tutorial about Submission Views in Brightspace quizzes.
Reports Setup
Reports Setup tab: Add Report
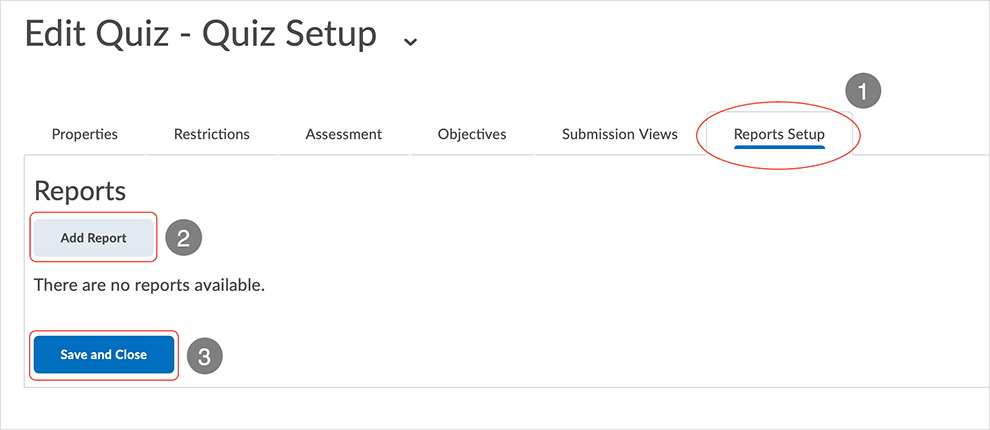
Use the "Reports Setup" tab to create reports to be shared with other users.
- The "Reports Setup" tab is active.
- Select "Add Report" to create report(s) as necessary.
- After creating a report or series of reports, select "Save and Close" to save and make reports available.
After a report has been created the top page display will indicate "Edit Report - _____"
- report name will be populated in the _____ space
To edit a report, when in the Report Setup area, click on the report name.
back to top
back to top of Reports Setup
Reports Setup tab: Report Name and Type
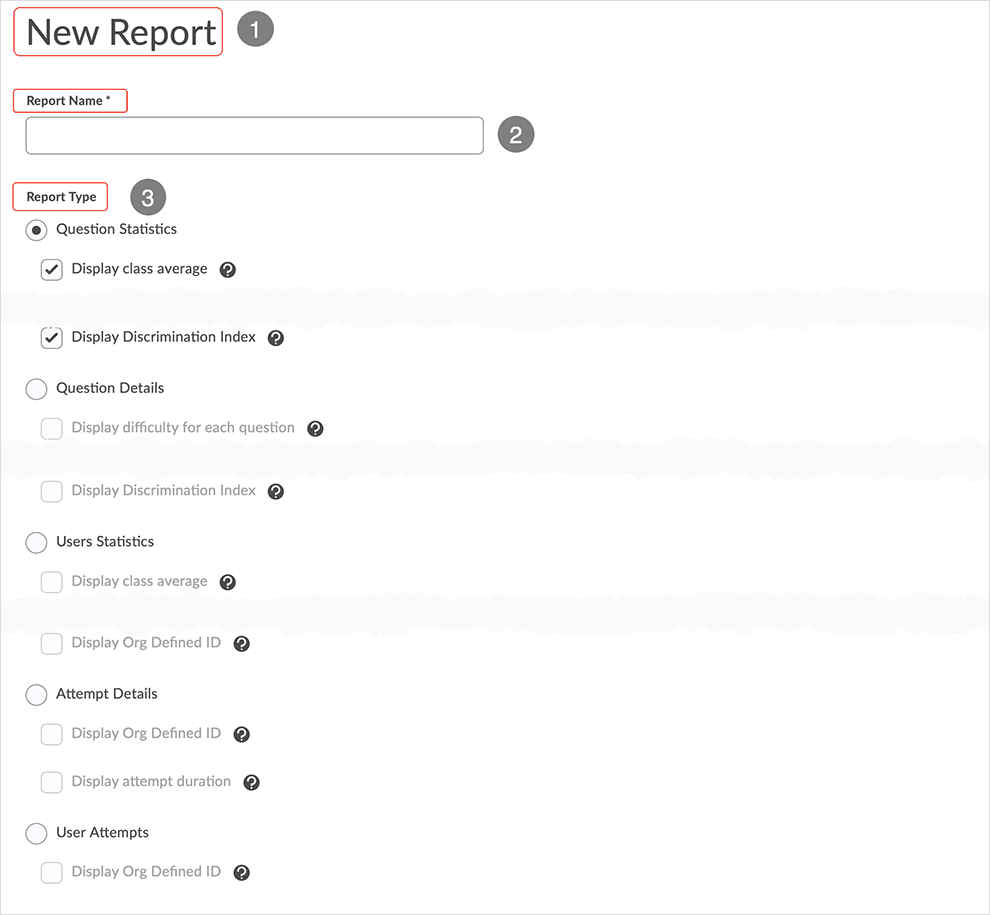
After selecting "Add Report" a "New Report" page displays.
- "New Report" statement appears at the top of the page.
- Assign a name for the report.
- Use the radio buttons and checkboxes to specify the scope of the report.
back to top
back to top of Reports Setup
Reports Setup tab: Release Report
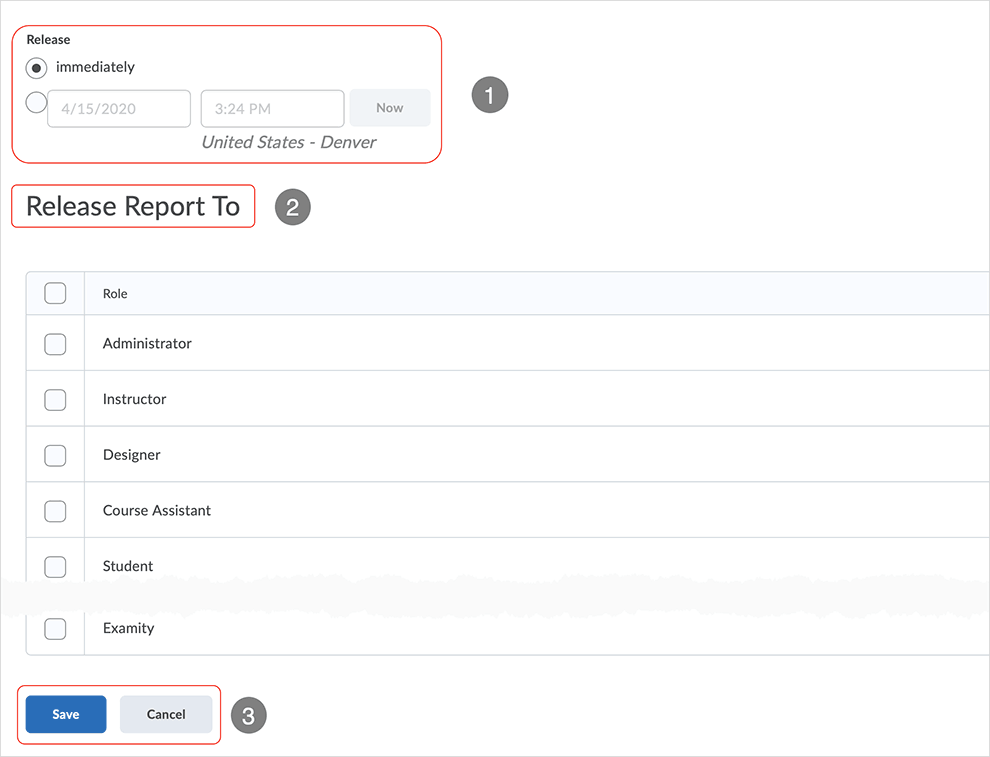
After establishing a report, choose "Release" parameters.
- In the "Release" area, select the radio button corresponding to "immediately" or set a date and time.
- Choose the role to "Release Report To" by selecting the proper checkbox or series of checkboxes.
- Select "Save" to save the created report and "Cancel" to exit the area.
back to top
back to top of Reports Setup
Resources
Brightspace resources are available from D2L and MSU
Brightspace Help tutorials related to Quizzes:
Select this link to access various topics related to Creating and managing quizzes
Brightspace Videos and Video Playlists:
Select this link to access a Brightspace video showing how to set up Special Access
Select this link to access a Brightspace tutorial/video "Customize the submission view for a quiz."
Select this link to access a video playlist from D2L - look at the Quizzing and Surveys Playlist
Local support documentation pointing to D2L Help resources:
Links will open in a new tab or window dependent on browser/OS configuration.
What dialog box windows look like and how dialog box windows and browsers interact is dependent upon the operating system and browser being used. The screenshots in this tutorial may differ from the screen that the user is viewing when performing the actions described in this tutorial.
CD 202010